By Irv Cooper
Contents of this page:
Some Quick thoughts on timing of Brushed Motors
Chart for manually advancing your motor without the use of a ammeter
Generic instructions for timing/reversing an tabbed 05 can motor (Includes Magnetic Mayhem)
Instructions for timing/ reversing a Kyosho Atomic Force 17 turn timeable motor.
=================================================
1) First some quick points on Timing Brushed Motors
Questions : Irv Cooper
=================================================
2) Chart for manually advancing your motor without the use of a ammeter
Here is a chart to manually setting the timing if you do not have an amp meter
Estimated Advance (For a place to Start) |
|||||||||
Case Dia |
Circumference |
5 |
10 |
15 |
20 |
25 |
30 |
Average Amps |
|
4 |
8 |
12 |
16 |
20 |
24 |
Degrees Advance |
|||
1.00 |
3.14 |
0.03 |
0.07 |
0.10 |
0.14 |
0.17 |
0.21 |
||
1.25 |
3.93 |
0.04 |
0.09 |
0.13 |
0.17 |
0.22 |
0.26 |
||
1.38 |
4.32 |
0.05 |
0.10 |
0.14 |
0.19 |
0.24 |
0.29 |
Inches Advance |
|
1.50 |
4.71 |
0.05 |
0.10 |
0.16 |
0.21 |
0.26 |
0.31 |
Measured on the case |
|
1.63 |
5.11 |
0.06 |
0.11 |
0.17 |
0.23 |
0.28 |
0.34 |
Circumference |
|
1.75 |
5.50 |
0.06 |
0.12 |
0.18 |
0.24 |
0.31 |
0.37 |
||
Inches |
|||||||||
Questions : Irv Cooper
=================================================
3) Generic instructions for timing/reversing an tabbed 05 can motor (Includes Magnetic Mayhem)
Notes:1) The comments will apply to most any electric motor, but there will be comments specific to the 05 can motors.
2) All directional statements will be while looking at the back side (Brush side) of the motor.
The rule of thumb for Timing Electric Motors for RC use is to find the neutral (lowest amp draw) position and then advance the timing until the amp draw without a prop is 10% of your expected average load plus the lowest no load current.Advancing the timing is to rotate the brush (back plate) into (opposite) the rotation of the motor. For Direct Drives you rotate the brush plate Counter Clock Wise (CCW) For gear boxes that reverse the output rotation of the motor you rotate the brush plate Clock Wise (CW).
DIS-ASSEMBLE THE MOTOR
First you have to get the motor apart so you can do this rotating. There are many methods from trying to just pry up the two tabs on the motor case to grinding them off.
The method I have found that works the easiest is to place a piece of wood on a solid surface, hold the motor with the shaft down and strike the shaft firmly but squarely on the wood. Keep your thumb on the back of the motor to keep the brush plate from popping off the motor armature. It will probably take several strikes until it comes apart, the shaft will not bend if you keep the motor pretty square with the wood while striking.
It is no great problem if the brush plate comes off of the armature other than its a little bit of fussing to get the brushes pushed back so you can re insert it onto the armature.
Once the Brush plate and armature are out of the case, finish bending the tabs on the case so that the brush plate will go back in easily.
SETTING THE TIMING.
Set up a cell pack with your Volt/Amp meter on the amperage scale -- a 5 AMP or more scale is all that is needed. Push the motor back together (back plate will now be loose and easy to rotate) Connect the cells in series thru your amp meter to the motor.
Rotate the back plate until the motor rotates in the direction you desire. Then moving the back plate CW and CCW find the point of lowest amps. Also write down what your lowest no load amp reading was. Do not rush, but also do not run the motor no load longer than necessary.
Scribe the neutral point on your motor for future reference. Determining amperage reading appropriate for advance. Just for example -- Lets assume you expect to get average flight times of 7 minutes from a 2000 mah pack. The average amp draw would be 2 Times (60/7) or 17 amps approx. If your neutral no load amps were 1.3 your desired advance will be 1.3amps + (10% times 17amps) or 3 amps.
Again with no load on the motor reconnect the battery and amp meter and rotate the brush plate CW until you are reading 3 amps. This is your proper timing place for your Gold Fire Motor running reverse to be use with a Gear Box.
Put marks on the Motor Case where tabs should be to lock the brush plate in position. Take the Armature and Brush plate back out. Cuts slots for new tabs reassemble the motor and bend down the tabs -- NOTE: Make sure you mark both the brush plate and the case. It will fit back together 1/2 turn out of position and it will be wrong if you do that.
Some do not mess with making new tabs, and just CA or house hold Goop glue the brush plate back in place. And that works fine also.
Try it, Its not as time consuming or complex as it sounds and you will be the new motor expert in your club afterwards.
Questions : Irv Cooper
=================================================
4) Instructions for timing/ reversing a Kyosho Atomic Force 17 turn timeable motor.
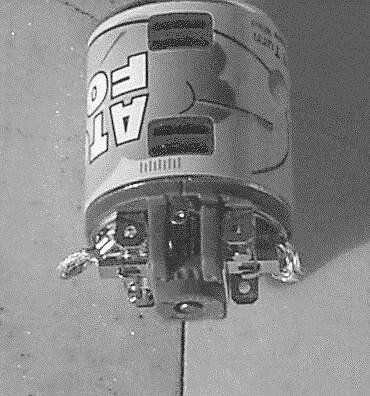
I have attached 4 pictures to help with the following description It is much easier than it sounds -- lots of words to do a couple of simple moves. If you get confused or are not sure you did it right, you can EMail (Irv Cooper ) We can then set up a time for voice on the subject if you would like. Step #1 is to mark the brush end bell and the motor casing so you can go back to the original condition and start over if you get confused. Step #2 Look at the back of the motor, locate two screws each located between the brush holders under the timing notch on the outside diameter of the red brush holder. Note the two screws holding the brush holder on. The two screws need to be loosened just enough you can rotate the brush holder end bell.On the backside of the brush end bell note that one terminal is marked plus. If the motor arrived in the normally as shipped condition, the timing notch closest to '+' mark will be lined up to the far right of the timing marks on the paper label. (Right as view as in the first picture; ).
Occasionally I have had them arrive in the Forward advanced position, with timing mark by the '+' symbol at the far left of the timing marks. as in this 2nd picture.
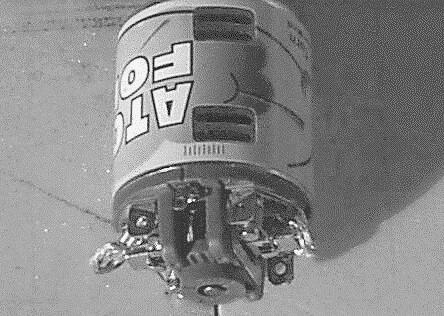
So to get your motor advanced for forward operation you just make sure it is in this state. However, this is a hot motor and in most cases you will be mating it with a gearbox that will reverse the rotation, so the next steps are to reverse the motor and get it advanced for reverse rotation.
Step #3 To reverse First make sure it is in the Forward neutral position as in the first picture. Step #4 Is to Keep the '+' terminal Plus. You want to rotate the back end exactly 180 degrees, making the the notch closest to the '+' mark line up with the left side of the timing marks as in this third picture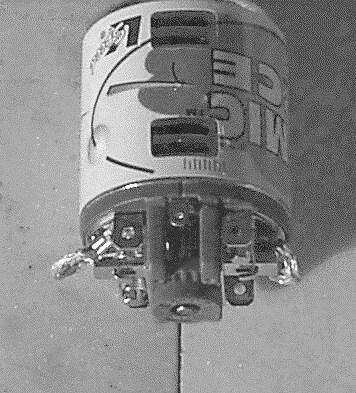
Step #4 Set the timing for reverse operation Rotate the brush holder so that the notch closest to the '+' mark is on the right side of timing marks as in this fourth picture
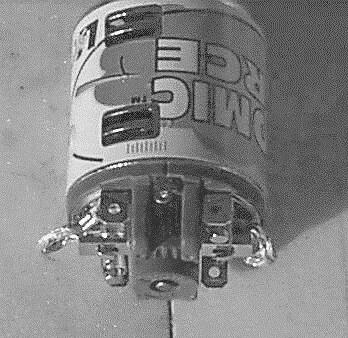
Now tighten the two screws so that the brush plate will not slip when the motor is operated.
Questions : Irv Cooper