| MARCEE
Minnesota Area R/C Electric Flight
Enthusiasts |
|
| Title: The POOR MAN's POOR
EXCUSE FOR AN AMPMETER
Or how to build a really cheap amp meter using your VOM / multi meter and a
standard automotive fuse as shunt.
Email:
Irv Cooper
|
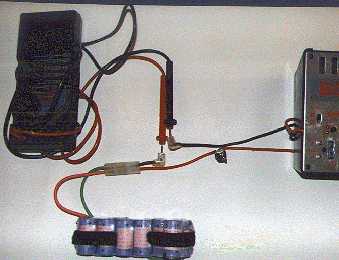
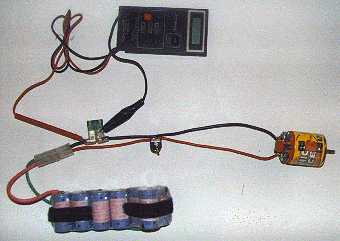 Illustration 1a
Amp Meter ready to measure Motor draw Radio, esc, & Prop not shown
for clarity |
Author Background: I was into RC Flight about 15 years ago and achieved a low-level
degree of competency and was pulled away into other things. Now back I have focused on R/C
Electric Flight and find re-entry harder than entry. My current technical skills far out
weight my flight skills which allow me to take off and usually return safely to the earth
and not be a nervous wreck when I am down. While serious about the hobby, I do not want to
take food off of the table to get all the nice stuff right away. Hence I have developed a
series of 'cheap' ways to have the needed test equipment to help me build better
performing models.
The Electric Motor AMPMETER from stuff you have lying around i.e. Cheap:
What you need:
- A fuse holder & fuse (Automotive type correct size for your application).
- A multi meter (VOM/Volt OhmMeter).
- Multi meter test leads/probes with small alligator clip ends.
- A friend's amp meter or your own to calibrate your POOR MAN's AMP METER.
How it works:
An amp meter is simply a shunt (a device with very low resistance in the amp range that
you wish to measure) with a sensitive volt meter (Milli or Micro Volt) across it to
measure the voltage drop and while it is calibrated in amps it is actually reading the
voltage drop across the shunt which is directly proportional to the amount of current
(amps) passing through the shunt.
In my poor man's poor excuse for an am meter, I chose a fuse for a shunt because they
are made very accurately and do not seem to vary much from one fuse to the next, they are
cheap, and I want one in my motor controller circuit to protect my esc and other items any
way.
Setting up your POOR MAN'S AMP METER:
- Wire in the fuse (& Holder)
: This setup can be installed permanent in your
aircraft or you can set it up with mating connectors so you can insert it FOR amperage
testing. In most of my motor harnesses I have soldered the fuse directly into the line
eliminating the fuse holder. I have never blown a fuse in flight, only on the test stand,
so soldering it in permanent has worked well for me. The fuse is wired in series with the
electric motor and the controller. I chose a 30-amp fuse the same as the max for my esc,
and I normally expect to fly my Astro 05g usually in the 15 to 20 amp range, with some
higher draws on takeoff and strong climb outs.
- Connecting the Multi Meter
: I made up test leads / probes having small
alligator clips to fasten to either side of the fuse holder (I stripped away just enough
fuse holder insulation to make contact, so the smaller the alligator clips the better}.
See illustration 1c.
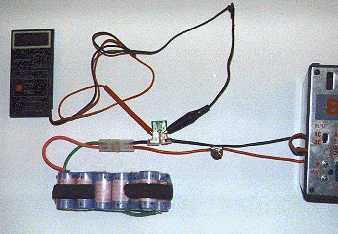
Illustration 1b
Calibration Setup using battery charger and VOM as an ampmeter
- Calibrating your AMP METER:
You are going to need an amp meter to calibrate your
POOR MAN's AMP METER setup. Of course a neat way to do this is to borrow an expensive
meter from a friend. Then take readings with the expensive meter compare with readings
from your home made meter and set up a table (see table 1) to translate your home made
meter's readings into amps.
Illustration 1c
Calibration Setup using battery charger and VOM reading millivolts
- Alternate method:
Use your multi meter which will have a amperage meter scale to
measure much lower amps than you want to measure when running your electric aircraft
motor. My multi meter is a pretty good one as it goes up to 10 amps. Most are maybe 2 to 5
amps max or less. But any amperage range will work. Just pick something that will draw
fewer amps than your multi meters amperage capacity. For me, I like to use my nicad
charger as I can set it for a wide variety of charging rates. I hook up my multi meter in
series with the charger and a battery pack and measure the amperage. When using my
adjustable nicad charger, I can adjust it to a nice even reading like 3 amps (Illustration
1b). Then I connect my fuse holder and fuse in series with battery pack and charger and
measure the milli volt drop across the fuse (in my test it read 15 milli volts at 3 amps,
illustration 1c). Then with a table (i.e. table 1) I can calibrate POOR MAN's AMP METER.
- The Math/Calculations: The
following example is made with one check point, at a low
amperage (3 amps) with my multi meter and then validated with a friends expensive meter
while running one of my motors. For my purposes I have found that a single point will do
because the fuse is quite linear. In my actual example, test setup using my nicad charger
and multi meter amp meter showed I was pulling 3 amps and when using the fuse holder &
30 amp fuse, resulting in a milli volt meter reading of 15 milli volts. Divide the amps
into milli volts and answer is 5 milli volts per amp. From that, calculate the following
table: (Note, I rounded off all my readings as I figured the whole system was not accurate
enough to go beyond whole amps and even milli volts rounded to the nearest 5 millivolt).
Amps |
Milli
Volts |
Notes |
1 |
5 |
|
3 |
15 |
Test
Point Milli volts/amp = 15/3 = 5 |
5 |
25 |
|
7 |
35 |
|
9 |
45 |
|
11 |
55 |
|
13 |
65 |
|
15 |
75 |
|
17 |
85 |
|
19 |
95 |
|
21 |
105 |
|
23 |
115 |
|
25 |
125 |
|
27 |
135 |
|
29 |
145 |
|
31 |
155 |
Verified
using 60 amp meter 30 amps = 155 milli volts |
33 |
165 |
|
Table #1
Conclusions & Exclusions etc:
- Before the flame mail pours in, this is the part where I say use at your own risk. No
guarantees, promises, warrantees, or liabilities on the part of the author.
- There is great debate as to whether a onboard fuse serves any positive use.
- Yes I know this is sort of crude, but it works and is much better than no amp meter at
all.
- Yes I know that 155-milli volt drop at 31 amps and an 8.4-volt flight pack is nearly a
1.5% power loss in the flight power system, but I put the fuse in anyway. Maybe some day I
will be 'hot' enough pilot to notice a 1.5% power loss.
- Your results will be only as good as the care you put into getting your calibration
readings and you should keep in mind this is not a replacement for high quality test
equipment.
- It is a cheap method of having a amp meter that you can take to the field to check how
things seem to be working especially if you need to change props etc due to the breakage
of your favorite and probably the only prop you have that size.
- This method should never put your electronic equipment at risk as a properly installed
fuse probably protects the system anyway.
- If you are running close to the edge of your fuse-rating etc., it could result in an
unexpected blown fuse and loss of flight power at a poor time (like take off). But again,
it is better than no amp meter at all. Actually much better.